

This post contains affiliate links. Please read my disclosure policy.
I've been baking gluten free since 2004, and over the years I've gathered a complete set of the best tools for gluten free baking. If you're going to be baking along, here's a peek into the small appliances, mixing bowls, utensils, tools, and pans you'll find me using as I go along. I try to explain why I have each piece, or whether I have something very, very similar that's just not available any longer.
At the top of this post, you'll find a Table of Contents with jump links to each of the individual sections, so you can skip right to the part you find most engaging. Within each section, you'll find a separate Table of Contents for an at-a-glance summary of what's below it.
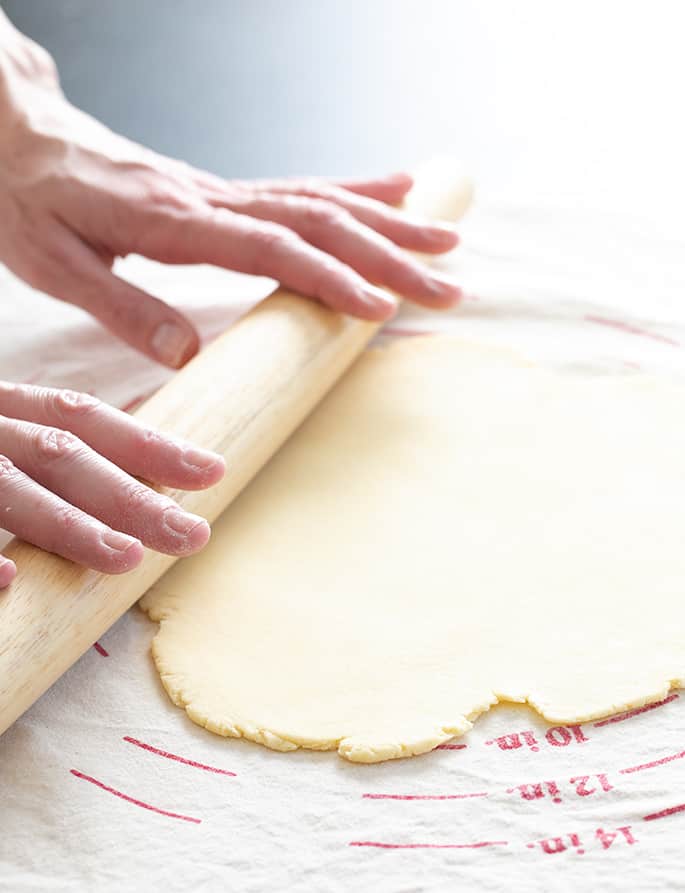
Table of Contents
The best small appliances for gluten free baking
Mixing and measuring tools for your gluten free kitchen
The best utensils for gluten free cooking and baking
Essential tools for gluten free cooking and baking
The essential gluten free baking pans
The best small appliances for gluten free baking
Table of Contents
KitchenAid Stand Mixer stand mixer
Cuinsinart Handheld Mixer hand mixer
KitchenAid Immersion Blender immersion blender
Ninja Nutri-Pro Blender blender
Full Size Cuisinart Food Processor 8 cup food processor
Small Food Processor 3 cup food processor
Chefman Tabletop Deep Fryer electric fryer
OXO Digital Food Scale kitchen scale

This tilt-head KitchenAid 4.5 quart stand mixer is the most economical stand mixer there is, and you can even use a 5 quart tilt-head metal mixing bowl in place of the 4.5 quart bowl. The total price should still be less than what you'd pay for a KitchenAid 5-quart stand mixer.

A handheld mixer is so useful, whether you have a stand mixer or not. This Cuisinart handheld mixer has 9 speeds, and comes with a storage case that carries regular beater attachments, and dough hooks. If you want to use your handheld mixer in place of a stand mixer for bread recipes using our gluten free bread flour, you'll need those dough hooks.

An immersion blender like this KitchenAid hand blender makes quick work of blending up tomato soup right in the pot, and is so easy to clean. One or more colors is always on sale, too, so choose frugally. A cleaning tip for you: when you clean the blades, use a sponge not your fingers for safety, of course, but avoid getting the part of the mechanism that inserts into the other half wet since it's hard to dry and never gets dirty so doesn't need cleaning, anyway.

I don't have a fancy schmancy Vitamix or a Blendtec blender and I don't think that you need one, either. This Ninja Nutri-Pro blender is powerful enough to do everything I need it to do, even if every once in a while I need to do it in batches if the canister isn't quite large enough to do it all at once. Every time I think I need a Vitamix, I remind myself of the price tag, choke on my coffee, and give my workhorse Ninja a friendly tap.

This Cuisinart 8-Cup food processor is large enough to make our homemade protein bars, and still small enough that it isn't too much of a pain to store in the kitchen cabinet. This one has fewer seams in the plastic canister than some, so it's a little easier to clean. But no full-sized food processor is easy to clean.

A miniature 3-cup food processor from Cuisinart is a tiny little friend in the kitchen that takes care of small chopping tasks, is easy to store, much less expensive than its 8-cup counterpart above, and is actually relatively easy to clean. Keep in mind that it won't fit a full-sized batch of protein bars, and doesn't have the other blades of its big sister, but I find it comes in handy quite often.

A tabletop electric fryer isn't an essential kitchen tool in your well-run gluten free kitchen, but it is incredibly useful if you want to make everything from gluten free donuts and gluten free apple fritters to authentic gluten free egg rolls and gluten free fried chicken. You can keep the smell and mess contained, maintain a steady, even oil temperature during frying, and make cleanup significantly easier. This isn't the model I have, which is a Cuisinart, but that suddenly went missing and this one has great reviews. It's what I plan to buy next, since the fryer I've had for a full 10 years is finally starting to show signs of age.

I rely on my OXO digital kitchen scale every day for accurately measuring the weight of pretty much anything. It has a pull-out display, and you can remove the metal tray for easy cleaning. You simply can't build a gluten free flour blend without a digital kitchen scale, but you can use a cheaper one. If you want to spend less but still get the job done with a little less ease, try the ever-reliable, pared down Escali brand kitchen scale. I have one of those, too.
Mixing and measuring tools for your gluten free kitchen
Not every ingredient can be measured by weight or mixed by machine, so even with our digital kitchen scale and machines, we're going to need some volume measurement tools like liquid measuring cups of different sizes and materials, measuring spoons, and mixing bowls. Here are my favorite tools to mix and measure.
Table of Contents
One quart Pyrex bowl 1 quart bowl
Full set of measuring spoons spoons
Set of silicone measuring cups silicone measuring
4 Cup Pyrex Measuring Cup big Pyrex measuring
Set of 3 Metal Mixing Bowls metal mixing bowls

A one quart Pyrex bowl is important for making gluten free artisan bread. Generally, the mixing bowls you choose to use are low priority for buying recommendations. This one is an exception, though, since it's oven-safe, encourages proper rising, and creates the perfect shape for that particular recipe. It's also a nice size for a Big Salad.

Not everything can be measured by weight, since we aren't getting a scientific scale that measures accurately to less than 1 gram. That means you need something like this 9-piece set of stainless steel measuring spoons. If you're feeling expansive, try also picking up this set with unusual sizes like 3/4 teaspoon.

Silicone liquid measuring cups in 4 cup, 2 cup and 1 cup volume capacities are really handy when measuring liquids, which don't lend themselves to being measured by weight. Here's a general tip about measuring liquids, just for fun: water is the only liquid with an equivalency between U.S. fluid ounces (a volume measurement) and ounces (a weighted measurement). 1 fluid ounce of water = 1 weighted ounce of water. All other liquids are variable.

It's always important to have at least one 4-cup Pyrex measuring cup with a pour spout and lots of markings. It's heat-safe and has a nice wide opening, so you can use it to make things like custards and puddings.

If you're looking for recommendations for mixing bowls, I present this 3-piece set of stainless steel mixing bowls with lids: 1-1/2-Quart, 3-Quart and 5-Quart bowls. They're steady but not heavy, so you can whisk and mix vigorously, but still lift the bowl easily to transfer batter to a pan.
The best utensils for gluten free cooking and baking
In this section, we're covering my favorite brand of silicone spoonula (it's a kind of concave spatula), metal spatulas for smoothing and spreading, all the types of whisks I use regularly, plus the simple tools I use for grating.
Table of Contents
Silicone Spoonula Spatula by GIR spoonula
Small Ateco Offset Spatula small offset
Large Ateco Straight Spatula larger spatula
OXO Large Spring-Loaded Cookie Scoop large scoop
#50 Spring-Loaded Ice Cream Scoop small scoop
Large Metal Balloon Whisk big whisk
Small Metal Balloon Whisk small whisk
Large Metal Flat Whisk flat whisk
Large Danish Dough Whisk Danish whisk
OXO Handheld Coarse Grater grater
Metal Zester/Microplane Grater microplane

My favorite silicone spatula is actually the GIR brand silicone spoonula spatula. It does everything a spatula can do, but is a bit concave toward the center, which allows you to scoop, not just scrape. GIR has lots of different colors and sizes, too, and they generally don't stain, either, and are dishwasher safe.

I use a small offset spatula so often to smooth the tops of everything from raw cake batters and pie fillings to frosting on something small, like a frosted sugar cookie or cupcake. A small spatula like this is much more sturdy than the long ones, giving you a lot of control.

Instead of a long offset spatula, I usually turn to this straight metal spatula, since the farther from the handle you go, the less stability a long offset spatula has. Ateco is a great brand for all sorts of cake and cookie baking supplies, but Wilton's products work well, too, if that's what you prefer.

Whether I'm portioning drop cookies, muffin, or cupcake batter, or this large spring-loaded OXO cookie scoop (3 tablespoon volume capacity) is truly indispensable in my kitchen. It keeps portions consistent, and comes clean in the dishwasher.

Sometimes you need a smaller portion, like if you're making energy bites, and this #50 cookie scoop comes in really handy. The number designation refers to the fact that it takes 50 scoops to make a quart of ice cream.

This is nothing more than a standard 12-inch large metal balloon whisk. The wires are sturdy enough to whisk even something thicker, like raw pancake batter.

This 8-inch small balloon whisk is also sturdy, so the tines never bend, and is ideal for mixing smaller quantities in smaller containers, where you can't fit a 12-inch whisk.

This 10-inch flat whisk is ideal for getting into edges when you're deglazing a pan or making a roux for something like gf gravy or even just the beginnings of a sauce. A balloon whisk is great for aerating things, but isn't the right shape to reach those nooks.

A Danish dough whisk is a really sturdy whisk that makes it surprisingly easy to mix heavier, stiffer, dough together with much less effort.

I do have a standard box grater, but I find that I reach for this OXO coarse grater with a handle much more frequently. It's much easier to clean since the design is so simple, and it has the standard size hole that I'm usually looking for. If I want a different size grater, I usually want a microplane.

This microplane grater/zester is essential for zesting citrus peel, finely grating hard cheese like Parmigiano-Reggiano, grating nutmeg, making fine chocolate shavings, and even grating ginger root.
Essential tools for gluten free cooking and baking
These aren't the bowls, and they aren't the utensils that we use to manipulate the dough. Instead, these tools are the ones I use to roll gf dough, shape it, and cut it in every way imaginable. Intriguing, right?
Table of Contents
Wooden French tapered rolling pin rolling pin
Double-Sided Wooden Pastry Roller pastry roller
Plain Round Cookie Cutter Set round cutters
Set of 3 Metal Biscuit Cutters biscuit cutter
Stand-Alone Analog Oven Thermometer oven thermometer
Simple Deep-Fry or Candy Thermometer candy thermometer
Metal Handheld Flour Sifter With Squeeze Handle sifter
Epicurean Standard Cutting Board cutting board
Bethany Pastry Board & Cloth Bethany board
Metal Bench Scraper scraper
Plastic Bowl Scrapers plastic scraper
8-Inch Metal Cake Cutter cake cutter
OXO Metal Cut & Serve Turner turner
Fox Run Aluminum Tortilla Press tortilla press

I always use a French rolling pin, rather than a classic rolling pin with handles since I find that it gives me a much better feel for the amount of pressure I'm putting on whatever I'm rolling. This one is 18-inches long, which is the perfect length since you hold the tapered ends, and roll with the middle section.

A small, double-sided pastry roller makes it easy to roll out smaller pieces of dough, and get into tight spaces (the roller you see in the image here is the wider of the two sides). It's far from essential, but once you use one to roll out pie crust, ravioli, tortillas, and won ton wrappers, you won't want to be without one in your kitchen.

A plain round cookie cutter set, with smooth metal cutters ranging from 3/4-inch to 3 5/8-inches in diameter in a small, compact tin, will help you cut perfect circles in everything from cut-out cookies to tortellini. They're not quite tall enough to cut out biscuits, but they'll do in a pinch!

For the perfect sharp edges on your round biscuits, you'll never need another if you buy this set of 3 metal biscuit cutters: 3.2-inch, 2.8-inch, 2.4-inch. Unlike cookie cutters, they're all 1.4-inches high, so you can cut rounds out of a thick rectangle of dough for mile-high biscuits.

Most ovens run hot, and nearly all ovens are out of calibration even if you're really diligent about keeping them tuned up (are you really?). An instant read oven thermometer is a much more reliable source of information on what the actual temperature is in your oven, and it's cheap and easy enough to replace frequently. As soon as mine gets dirty, I know it's probably time to replace it. Stock up!

Even if you buy the tabletop electric fryer we discussed above, it's good to have at least one classic candy/deep-fry thermometer for cooking sugar to just the right temperature to make marshmallow ice cream or marshmallow fudge.

If you're making angel food cake, there's no way around it: you're going to need this simple metal sifter with squeeze handle (not rotary) to sift your flour. It's not often that we need to sift flours, but when you must, you must. Of course, you can always use a fine mesh strainer, which has other uses as well. I prefer one of these handheld sifters for sifting flour, though, since a strainer is a messier, less-contained way of sifting.

I love every Epicurean cutting board I've ever bought. They don't dull your knives, they stay in place as you're cutting, are dishwasher safe, and don't stain. This one is 11.5-inches tall x 9-inches wide, which is a nice standard size.

As much as I hate to admit it, shaping raw gluten free bread dough is a bit trickier than conventional dough, even with my very best recipes. This 20-inch Bethany pastry board and cloth is one you've seen me using in many how-to videos here on the blog. It's a simple wooden board covered in a canvas cloth, and it creates a semi-nonstick surface for shaping all manner of dough, allowing you to use much less additional gluten free flour during shaping. The canvas is removable and washable, and you can also purchase a replacement canvas if yours wears out.

To help you divide and cut raw dough, scrape down your surfaces, and even measure the length and width of your dough, this 6-inch long metal bench scraper is extremely useful.

A rigid plastic bowl scraper is also useful for cutting dough into portions, scraping down a sticky surface, and transferring dough from one surface to another safely.

This 8-inch stainless steel cake cutter is intended to be used to cut cake rounds out of a rectangle or square, but I use it to create clean edges on homemade tortillas. You'd be shocked how often it comes in handy!

This is a small (the dimensions are 1.85 x 1.65 x 9 inches) metal cut and serve turner from OXO. It's just thick enough to be sturdy, narrow enough on the edge to cut a pan of brownies, and short enough to get up under that corner piece without disturbing the next one.

Every time I post a recipe for any sort of gf tortillas, someone asks if they can use a tortilla press to make the rounds. The answer is usually ‘yes,' but you'll usually have to finish up with some sort of rolling pin afterward since a tortilla press is a great start but it doesn't make your wrap thin enough to bend without breaking.
The essential gluten free baking pans
Finally, here are the pans that I bake nearly everything on that goes in my ovens: every shape of cake pan, pie plate or pan, loaf pan, muffin tin, donut pan, and finally my favorite nonstick wire rack for cooling all those beautiful pies, cakes, cookies, and baked donuts.
I have tried to find a single pan manufacturer that has every sort of pan I could ever need. I dreamed of a completely uniform-looking set of beautiful pans! It wasn't meant to be, though, since some brands do many things right, but none of them do everything right. Here's the best of the best!
Table of Contents
8-Inch Round Baking Pan from Fat Daddio 8 inch round
9-Inch Round Baking Pan from Fat Daddio 9 inch round
8-Inch Square Baking Pan from Fat Daddio 8-inch square
9-Inch Square Baking Pan from Fat Daddio 9-inch square
13-Inch x 9-Inch Rectangular Baking Pan from OXO 13 x 9 rectangle
9-Inch Square English Shortbread Pan from NordicWare shortbread pan
Classic Nonstick Baked Donut Pans from Wilton donut pans
Classic 10-Cup Nonstick Bundt Pan from NordicWare bundt pan
10-Cup Brilliance Nonstick Bundt Pan from NordicWare brilliant bundt pan
Classic Nonstick 2-Piece Tube Pan from Chicago Metallic tube pan
Nonstick Jelly Roll 10-Inch x 15-Inch x 1-Inch Pan from OXO jelly roll pan
Aluminum Quarter Sheet Pans from NordicWare quarter sheet pans
Aluminum Half Sheet Pans from NordicWare half sheet pans
Nonstick 12-Cup Standard Muffin Tins from Wilton standard muffin tins
Nonstick 24-Cup Miniature Muffin Tins from USA Pans mini muffin tin
Nonstick Standard 9-Inch Pie Dish from USA Pans 9-inch pie plate
10.5 Inch Round Ruffled Deep Dish Pie Pan from Sweese deep dish pie pan
9-Inch Nonstick Springform Pan from Cuisinart springform pan
Nonstick 8.5-Inch x 4.5-Inch Loaf Pan from OXO 1 pound loaf pan
Nonstick 9-Inch x 5-Inch Loaf Pan from WilliamsSonoma's Goldtouch Line 1.25 pound loaf pan
1 Pound Nonstick Pullman Loaf Pan with Lid from Chefmade 1 pound pullman pan
2 Pound Nonstick Pullman Loaf Pan with Lid from USA Pans 2 pound pullman pan
Nonstick Wire Cooling Rack from OXO wire rack

I really love Fat Daddio brand cast aluminum pans, since they're lightweight but sturdy, have no seams where anything can get stuck, and bake cakes very evenly. Let's begin with this 8-inch x 2-inch round baking pan, since that's the pan I use more often than others.

Almost anything that can be made in an 8-inch round cake pan can also be made in a 9-inch x 2-inch round baking pan, and baked for less time. A larger pan with the same amount of batter means a thinner layer of batter, which bakes more quickly.

The Fat Daddio square baking pans have nicely shaped corners (not too sharp, not too round), and a simple overhanging edge for grabbing with your potholders without disturbing the baked goods in the pan. We're starting with this 8-inch x 2-inch square baking pan.

Next up is the same square pan, but with 9-inch x 2-inch square baking pan dimensions. Same cast aluminum, so be sure not to ever put it in the dishwasher, or you'll ruin your pans. They clean up so easy in the sink, though.

I don't often bake in this 13-inch x 9-inch nonstick baking pan from OXO, since I find that it can be tricky to get baked goods of this size to bake evenly all the way through without burning on the bottom toward the center, where the pan tends to get hottest. If I do, this is the pan I use, though. It's also useful as a roasting pan, too.

You don't really need this 9-inch square English shortbread pan—unless you want to make beautiful gf English shortbread during the holiday season. Then, you need this pan because it's beautiful, and it's the best weight and quality, and has the most beautiful, tasteful pattern.

I'm very, very particular about my donut pans, and this two-pack of 6 cavity nonstick Wilton donut pans is just the best. To make baked donuts, you need a pan with donut wells that have a prominent center column. Otherwise, as the donut batter rises, it seals up the hole. These are nonstick, and have lovely center columns.

A classic 10-cup bundt pan is essential for making, well, a gf bundt cake, and this cast aluminum pan from NordicWare is solid, well-constructed, bakes evenly, releases cleanly, and is made to last.

For a fancier look like we used in our gluten free marble bundt cake, use this beautiful, gold-colored 10-cup brilliance bundt pan from NordicWare. Like its classic cousin above, it's the right material for the job.

If you ever want to make a classic gf angel food cake, you'll need a tube pan. This one from Chicago Metallic is nonstick, since you can't grease the pan, with the little feet that allow you to turn it over and allow the cake to cool upside down once it's finished baking. It has about a 16-cup capacity, which is standard for fluffy angel food cake batter.

My favorite size rimmed baking sheet is this 10-inch x 15-inch x 1-inch jelly roll pan. This one is nonstick from OXO brand, and you'll reach for it again and again, even when you're not making a gf Texas sheet cake or gf pumpkin slab pie.

I bake cookies, biscuits and everything in between in sheet pans, and a quarter sheet pan like this aluminum 2-pack from NordicWare is a good basic option that's easy to store in your kitchen, or even in your oven. Remember that it's not made of stainless steel, so it will stain and can't go in the dishwasher. Stainless steel sheet pans are much more expensive, though, so I stick with aluminum and line my pans.

For larger batches, this 2-pack of aluminum half sheet pans from NordicWare aluminum is really useful. You can usually fit a dozen drop cookies on here, with plenty of space in between for spreading.

Finding the right standard 12-cup muffin tin is trickier than it sounds. These are nonstick tins from Wilton's Recipe Right line, and come in a 2-pack. No matter what you do, they'll stain, but these tins are the right size, the right shape and size wells for beautiful muffins, and they're light in color. If your baking pans are dark in color, they attract too much heat too fast and the outside is likely to burn before the inside is baked all the way through.

This miniature nonstick 24-cup muffin tin from USA Pans isn't perfect but it's the best there is. The wells are just the right depth, the sides are slightly angled which makes a prettier shape, the pan is light in color and heats evenly. The nonstick coating is also quite durable.

This classic 9-inch nonstick pie plate from USA Pans brand with sloped sides is made from nonstick-coated aluminized steel is durable, easy to clean, and I find that it never needs to be greased, making it much less likely to stain or discolor.

When you need a deeper pie pan, I love this 9-inch deep dish pie pan with a ruffled edge from Sweese. The ruffled edge makes it easy to produce a beautiful edge on your gf pie crust, and the cleanup couldn't be easier. It looks just like the Emile Henry pie dish, but it's less expensive.

I've tried so many springform pans for the best gluten free cheesecake, and this 9-inch springform pan from Cuisinart is one of the best. It's reliably nonstick, easy to assemble, and has the light color that you need if you don't want to burn your baked goods.

This OXO nonstick 8.5-inch x 4.5-inch 1 pound loaf pan is light-colored, so your bread doesn't burn on the outside before the inside is baked through. Plus, it has no seams, so your bread doesn't get stuck in any crevices. You can line it with parchment if you like, but it really isn't necessary.
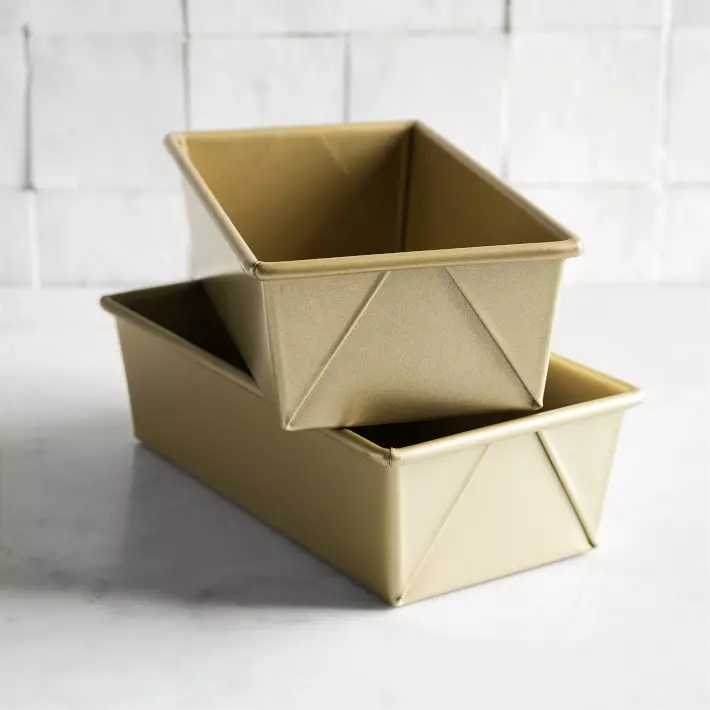
If you'd prefer a loaf that's slightly longer, this 9-inch x 5-inch 1.25 pound loaf pan from Williams Sonoma's Goldtouch line is the way to go. I've had these pans for the better part of a decade, and they're a tiny bit discolored, but perform just as well as the day I bought them!

Chefmade's nonstick Pullman .99 pound loaf pan with lid is my go-to pan for making my everyday gluten free sandwich bread these days, since I love how it makes a tall loaf. You can use the lid to cover the dough as it rises, and then keep it in place for baking, or remove it entirely.

This Pullman 2 pound loaf pan with lid from USA Pans is the best standard double-recipe loaf pan. Don't forget to double the ingredients for a 1-pound or 0.75 pound recipe

Almost every baking recipe on this blog ends with an instruction to remove the cookies, bread, or cake from the baking pan and turn it out onto something like this wire cooling rack from OXO to cool completely. I really like the modest size of this rack (11.5-inches depth x 18.5-inches width x 1.5-inches height), the fact that it's nonstick, and heat-safe up to 450°F/232°C.
Tips for buying gluten free kitchen tools
There's no such thing as gluten free products when it comes to kitchen tools, appliances, and other essentials. Instead, this is a name we give those kitchen must-haves that we take extra care to keep safe from contamination.
Now that we've discussed my favorite specific baking tools for all the gf baking I do, here are some tips for how to choose and maintain the safety of all the utensils, tools, small appliances, cooking aids, and everything else you'll find in the kitchen.
Since my son went on a gluten free diet when he was very small, there was no question that we were going to make our whole home gluten free. I wanted his home to be a haven for him, where he didn't have to think or wonder if anything was safe to eat or use.
If I or another adult had been the gluten free person in my house, I'm certain that my house would only be partially, but not wholly, gluten free. If you're like me, and you find the idea of having any gluten in the home to be really stressful, I'd like to offer some possible suggestions for how to keep the gluten free eater as safe as possible from cross-contamination. After all, when my gluten free son eats out of the home, he is eating food prepared in shared spaces.
Invest in shields and protectors
If there are members of your family that don't follow a gluten free diet, and you're not willing or able to keep your home environment completely free from gluten, there are a number of items in the kitchen that simply can't do double duty. But it doesn’t necessarily have to apply to absolutely everything.
We live in a wonderful time when those with celiac disease or a gluten intolerance can take advantage of products that have been developed for those who like easy cleanup. Specifically, I’m talking about shields, covers, and other barriers for keeping food from contacting pans, bowls, and other items in the kitchen.
Here are some relatively simple solutions that can keep your gluten free eater safe without buying 2 of everything. Please keep in mind that there is a significantly greater risk of cross-contamination with gluten when using any of these methods, so I'm not endorsing or encouraging them their use. Rather, I'm offering some potential solutions where the ideal situation just isn't possible:
- Cupcake and muffin liners – Always use them, and you’ll help avoid contamination and keep your muffin tins in pristine condition.
- Toaster bags – If possible, it's really best to have a separate toaster for gluten free foods, since crumbs are largely unavoidable in a toasting environment. But if that's simply not possible, like if you're in someone else's home for any reason, thin, reusable toaster bag liners were originally developed to keep crumbs, cheese, and other remnants from dirtying your toaster. If you make sure everyone in your house uses one when toasting bread, you’ll ensure your toaster stays relatively safe for the whole family.
- Baking sheet liners – I don't really care for Silpat baking mats since they tend to speed baking and alter baked goods that are cooked and baked on them. If you use Silpats, I recommend using them only for one purpose: gluten free or gluten baking, since they would be impossible to keep straight. As an alternative, I make liberal use of parchment paper whenever I'm baking something, as a means of easy cleanup and creating a nonstick surface—and they can help keep your baking sheets clean from cross-contamination.
Look for essentials that are easy to wash
Not everything in your kitchen can be covered or shielded, so now it’s time to make decisions about what you can safely use for both gluten and gluten free cooking, what you can’t, and how to make those decisions.
Let’s start with cookware, like pots and pans. Storing two sets can be tricky, so if you can avoid having doubles, you’ll save yourself a headache.
When shopping for a new cookware set, look for a strong material that can easily stand up to repeated washings in the dishwasher — very hot water and a strong detergent are a must for destroying remnants of gluten.
Things you can't wash
Speaking of things that are easy to wash, let’s take a moment to focus on a couple that aren't. The first is your colander. Even if you have a metal one that can stand up to the high heat of the dishwasher, I recommend buying a second one for your gluten free cooking.
This is because colanders — as well as strainers and other items with a mesh surface — are notoriously difficult to clean, no matter how you do it. Each of those tiny holes is a potential hiding place for gluten, and honestly, I could never trust myself to clean a colander well enough to use it for both gluten and gluten free food preparation.
The next tool I recommend you purchase twice is the food processor. Like colanders, blenders and food processors have lots of nooks and crannies where dust and food remnants can hide.
If you're worried about space, I highly recommend a personal blender like the Magic Bullet. You can buy a set with color-coded cups — make some cups all purpose, and make others gluten free only.
Buy doubles of commonly used tools
Try as you might to cut down on duplicates in the kitchen, there will be instances that you simply cannot avoid — it’s just not safe to use some items for both gluten and gluten free cooking.
The first to come to mind is the cutting board. Sure, you could use a thin, flexible cutting mat over your more robust board, but chopping, dicing, and slicing can be messy business, so the risk of cross contamination is high. Because cutting boards are relatively inexpensive and easy to store, it’s better for all to simply buy two separate ones for gluten and gluten free cooking.
The next group of kitchen essentials that you should consider buying doubles of are silverware, cooking utensils, and knives. Sure, you could pop most into the dishwasher and run it on high heat for a deep clean, but I don’t think that’s enough.
Case in point: When’s the last time you pulled a “clean” spoon from the dishwasher to find mystery goop still stubbornly attached? If that goop turned out to be dried gravy or cream of wheat, you’d have a problem on your hands.
Mixing bowls, measuring cups, and storage containers are the last class of kitchen essentials you should buy doubles of. My reasoning is pretty simple: The more you use an item for particular ingredients, the harder it is to remove every trace of those ingredients. It's even worse when you're dealing with liquids or fine ingredients.
For this reason, I would always recommend that you buy separate containers for pantry staples like gluten free flours and gluten free soy sauce — there's too much risk otherwise.
Color coordinate to avoid confusion
So you’ve decided you’re going to buy separate mixing spoons, plates, and other items to be absolutely certain that you won’t cause cross contamination with gluten. Here’s the next thing to consider: How will you tell them apart?
I think the easiest way by far is by color. These days, you can buy just about anything in any color you desire. Red, blue, pink, purple? No matter which you like, you’ll find pots, pans, utensils, toasters, microwaves, even refrigerators and dishwashers (though I don’t think you need to go that far!)
If you have young children, let them decide what color their gluten free “safe” items will be; they’ll be more excited to use them when they’ve had a chance to help with the decision-making process.
If you live in a house with older kids and adults, my advice is to go bright and bold. Believe me, no one will mistake the firetruck red mixing spoon for anything other than the gluten free spoon!
Use the label maker and sticky notes
In some cases, you may purchase gluten free kitchen tools that are not visually distinguishable from those that will be used in regular cooking. Take gluten free food storage containers, for example. They’re available in different colors, but depending on the size or style you need, you may not have many options.
Combine that with a pantry that's got almond flour, brown rice flour, white rice flour, coconut flour, wheat flour, Expandex, tapioca starch, cornstarch, xanthan gum and other ingredients that aren't easy to tell apart by sight, and you have a real problem on your hands.
This is where a label maker, stickers, sticky notes, and other labeling tools can be extremely helpful. With just a few clicks or swipes of your pen, you can quickly and effectively label items throughout your kitchen, so there is no mistaking gluten free pantry items and everything else.
Better yet, labels made with many label makers are waterproof, so even after you've washed a container, the label will stay put. When you get back from the local grocery store with your gluten free foods, just reach for the labeled ones.
These are the small appliances that have earned a spot on my kitchen countertop and in my cabinets. They make it possible for me to weigh accurately to build gf flour blends and get consistent results in all baking recipes, mix, process and blend gluten free bread and other dough and batters smoothly, and even deep fry at a consistent temperature.
The post The Best Tools For Gluten Free Baking in 2022 appeared first on Gluten Free on a Shoestring.